Reverse Engineer a Verisure Wireless Alarm part 1 – Radio Communications
1. Introduction
Verisure is a supplier of wireless home alarms and connected services for the home. A Verisure setup can be composed of multiple devices, sensors and/or detectors such as Motion detectors with camera, Magnetic contacts for doors or Windows, Smoke detectors, Keypads, Sirens, etc. Each component of the setup communicates using wireless technology with the central gateway called “Vbox”, it-self monitored by Verisure agents through the Internet and/or 3G connection.
As a Verisure customer, I was curious to get a clear view of the design and security measures implemented by the manufacturer. I therefore decided to buy a testing Kit on eBay (120 Euros) to open it and starting an exciting journey inside the boxes.
This post is the first part of my Verisure story and aims to observe radio communications between the multiple devices of the alarm. In other words, we will translate the radio communication into binary messages. Please note that Verisure is the new name of Securitas-Direct. You may potentially find both names in my scripts and screenshots.

2. Discovering frequency and modulation
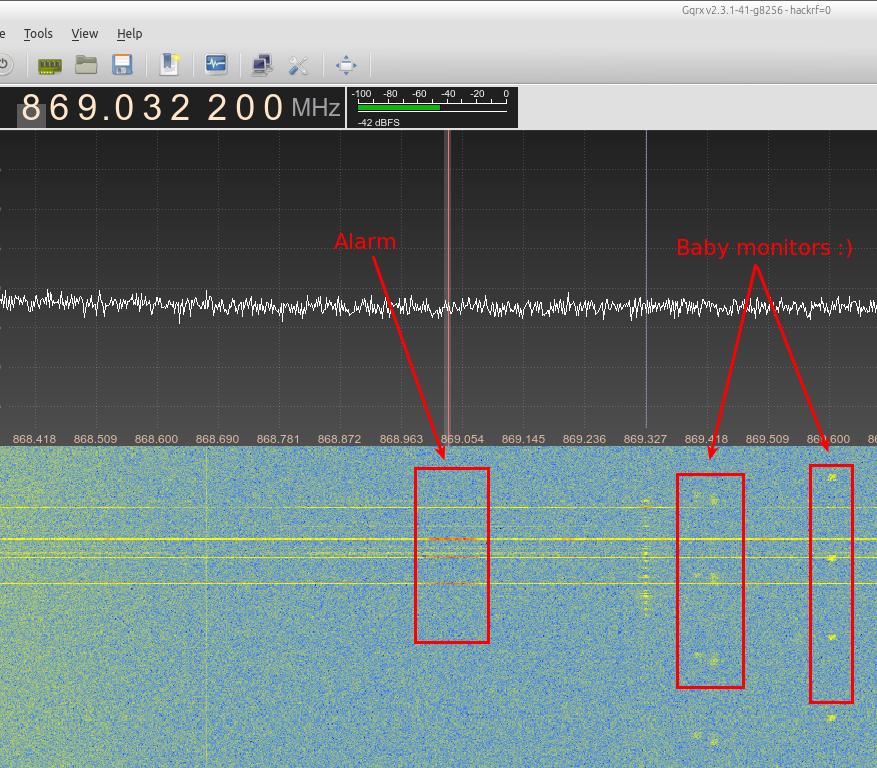
We know that 433 MHz and 868 MHz are popular bands for such equipments. Starting our favorite spectrum analyzer (GQRX in this case) confirmed our thoughts by showing some strong pulses while we were pushing random keys on the keypad alarm, located next to the HackRF.
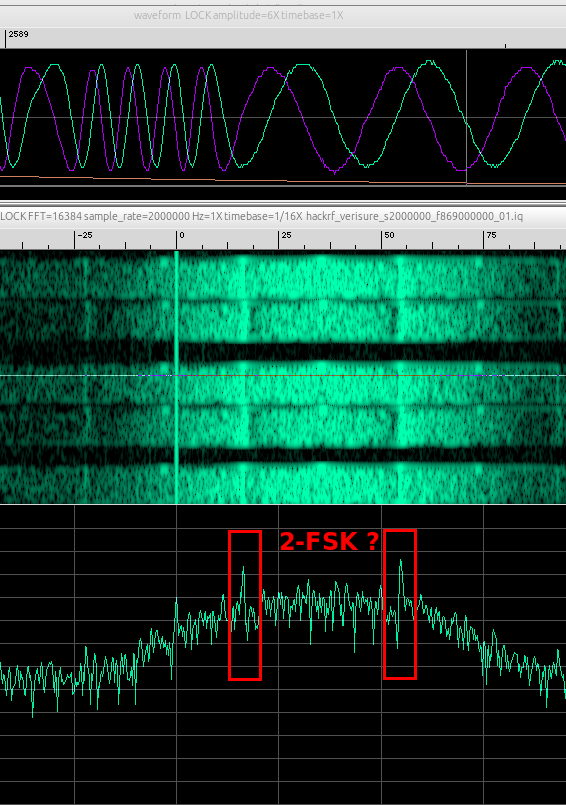
In order to get a clear view of the signal, samples were recorded using hackrf_transfer tool and then opened into baudline:
$ hackrf_transfer -s 2000000 -f 869000000 -a 0 -r /tmp/hackrf_verisure_s2000000_f869000000_01.iq
call hackrf_sample_rate_set(2000000 Hz/2.000 MHz)
call hackrf_baseband_filter_bandwidth_set(1750000 Hz/1.750 MHz)
call hackrf_set_freq(869000000 Hz/869.000 MHz)
call hackrf_set_amp_enable(0)
Stop with Ctrl-C
3.9 MiB / 1.000 sec =  3.9 MiB/second
3.9 MiB / 1.000 sec =  3.9 MiB/second
3.9 MiB / 1.000 sec =  3.9 MiB/second
4.2 MiB / 1.000 sec =  4.2 MiB/second
3.9 MiB / 1.000 sec =  3.9 MiB/second
3.9 MiB / 1.000 sec =  3.9 MiB/second
3.9 MiB / 1.000 sec =  3.9 MiB/second
4.2 MiB / 1.000 sec =  4.2 MiB/second
^CCaught signal 2
2.1 MiB / 0.540 sec =  3.9 MiB/second

User cancel, exiting...
Total time: 8.54128 s
hackrf_stop_rx() done
hackrf_close() done
hackrf_exit() done
fclose(fd) done
exit
Nice! Zooming into the signal shows 2 spikes which means that we are probably in front of a 2-FSK modulated signal.
3. Chipsets and datasheets
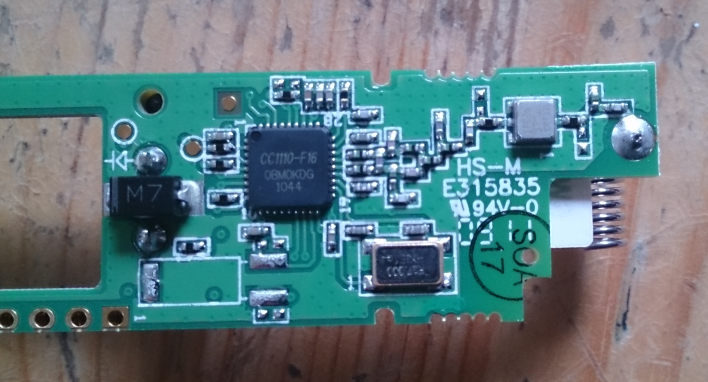
Before going further, it could be interesting to learn a bit more about the micro-controller used by the devices. As you will see, this information is really helpful since it gives us some clues about the potential modulation, ciphering, data encoding, etc. Opening a magnetic contact revealed a CC1110-F16 chip.
Briefly, the datasheet informs us about the following capabilities of the chip:
- Modulation: 2-FSK, GFSK, MSK, ASK, and OOK
- 128-bit AES supported in hardware coprocessor (so if data looks encrypted, we probably already know which cipher suite is in use)
- 8051 MCU architecture (needed later for IDA Pro)
- Optional automatic whitening and de-whitening of data.
- …
Additionally, we know a magical firmware called RFCat which can definitively help us to learn and play with CC1110 chips. RFCat will be largely used in the next parts of our Verisure story. For now, we will focus on GNURadio framework and the HackRF One SDR platform.
4. GNURadio at works
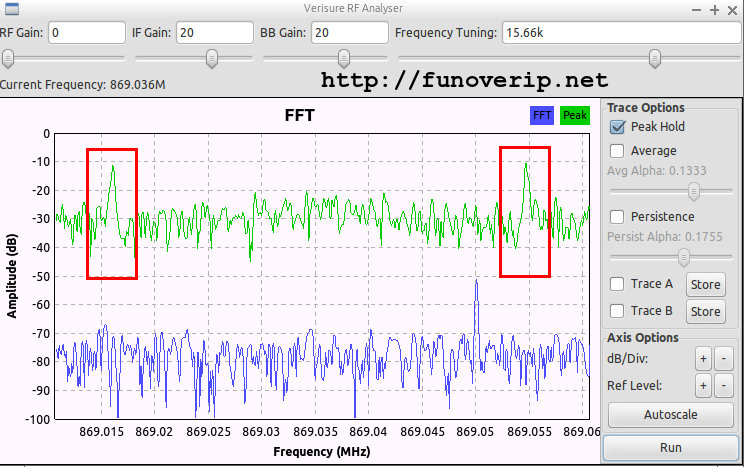
41. A First FFT
Let’s build a simple GNURadio flowgraph using the HackRF as a source, plus an FFT Sink. To avoid DC spike in the middle of our signal, we tune the HackRF to 520KHz below the interesting frequency, and then shift back the signal using the Frequency Xlating FIR Filter block. A few GUI sliders are used to control the gain and to provide additional fine-tuning of the frequency.
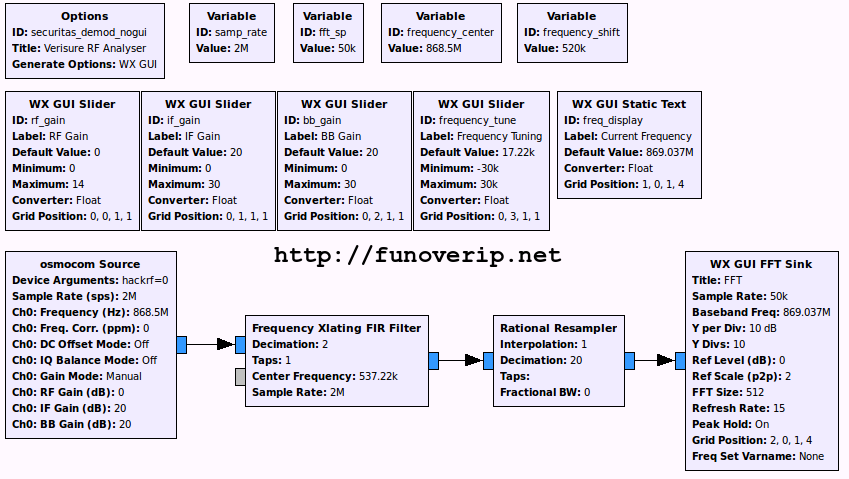
Great. Our supposed 2-FSK modulated signal is back. The center frequency is about 869.036 MHz.
.
4.2. Signal filtering and demodulation
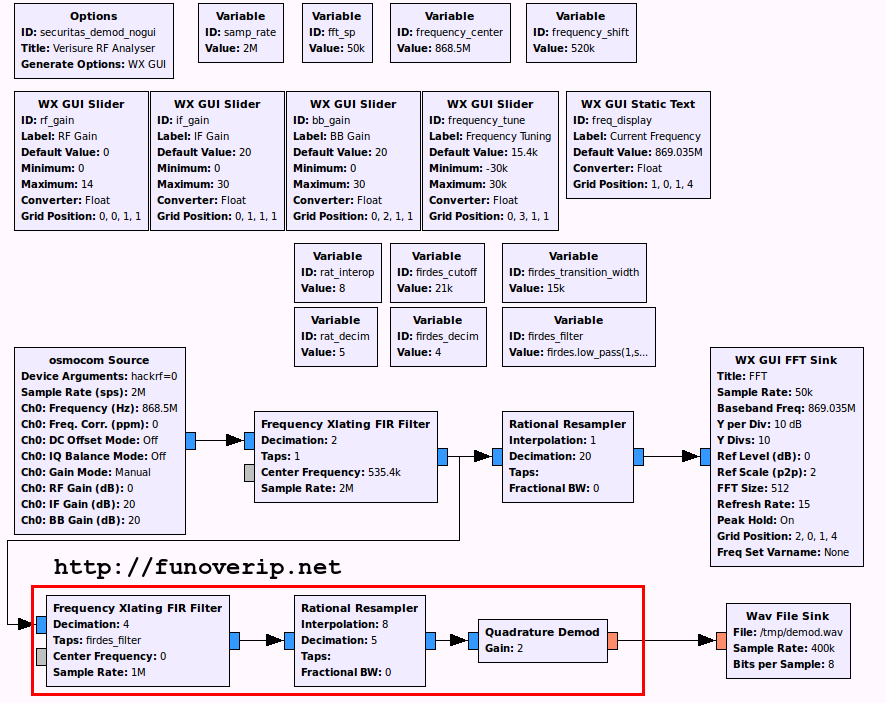
It is time to start demodulating the signal but first, we need to remove any unwanted noise or adjacent communications.
4.2.1. Filtering
Using baudline, we have observed about 38.3 KHz between the MARK and SPACE frequencies, so a deviation of about 19 KHz.

In our GNURadio flowgraph, we then apply a Lowpass filter against our signal using a cutoff value of 21 KHz (so a bit more than 19 KHz) and a transition width of 15 KHz:
firdes.low_pass(1,samp_rate, 21000, 15000)
4.2.2. Demodulation
As we are facing a potential FSK modulated signal, a new Quadrature Demod block is added to the flowgraph, which will then send the demodulated signal into a WAV file for further analyze. The new flowgraph becomes:
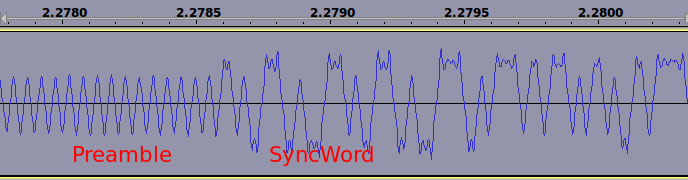
Haaaa, by opening our WAV file using Audacity (or any other WAV file editor), the demodulated signal seems to reveal its secrets: a preamble (0101010101…) and a potential synchronization pattern.
Let’s go a bit further by slicing the signal into propers 0 and 1. The Binary Slicer block aims to convert all samples above 0 to 1, and sample below 0 to 0. The block is inserted between the demodulator block and the WAV sink.
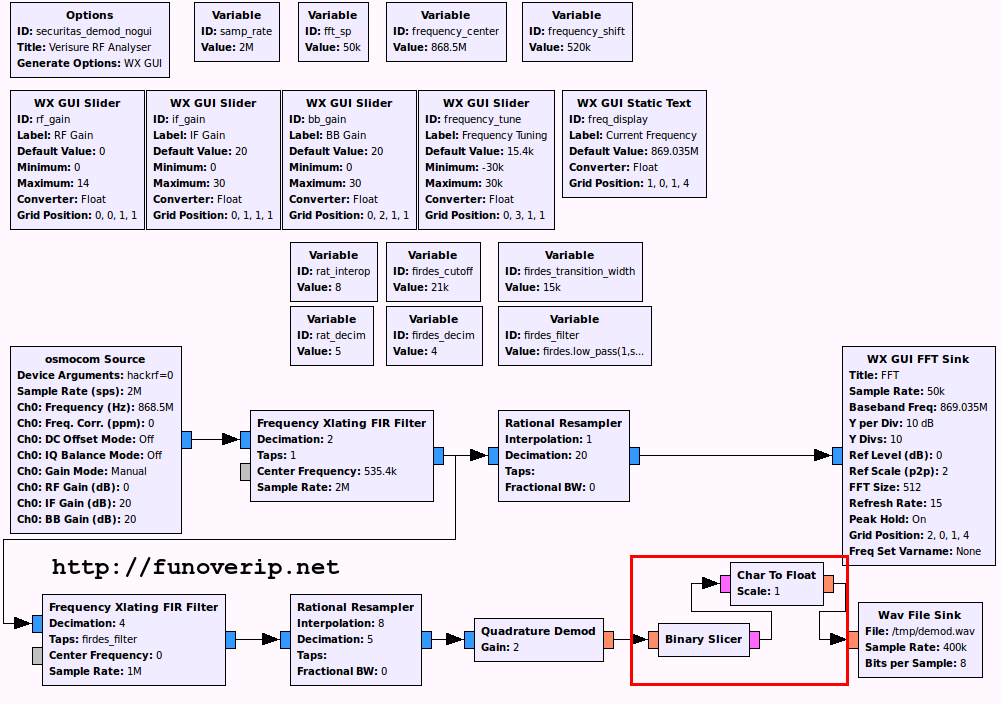
Back to Audacity, this beautiful binary sequence appears…

4.3. Getting sync-word (Access Code)
Getting the synchronization word is now only a matter of observing the pattern just after the preamble. Audacity helps to do this by adding a Label layer on top of the WAV signal. The difficulty here is to find the right police character which match (more or less) the flow of our signal. We observe a double SyncWord equal to 0xD391.

4.4. Getting symbol rate and samples per symbol
So far so good. The next step is to discover the symbol rate and the samples per symbol needed to convert this signal into a binary sequence (done by the “Clock Recovery” block).
4.4.1. Symbol rate
What is “Symbol Rate” ? By symbol, we mean 0 or 1. Thus the question to answer is “How many 0 or 1 do we observe per second?”. I know that better techniques exist to compute this value (I just need to learn them) but right now, I will simply count the number of symbols from the Audacity view:

We count about 69 symbols during 0.00180 seconds, which give a symbol rate of 38333
$ echo -n "010101010101010101010101011010011100100011101001110010001111100001111" | wc -c
 69

$ bc
 bc 1.06.95
 Copyright 1991-1994, 1997, 1998, 2000, 2004, 2006 Free Software Foundation, Inc.
 This is free software with ABSOLUTELY NO WARRANTY.
 For details type `warranty'.
 69 / 0.00180
 38333
 quit
As I said, this method is probably not the most accurate. Actually, I found a more precise value by performing the same exercise on a lager portion of the signal (but making screenshots less clear). The final symbol rate is 38450.
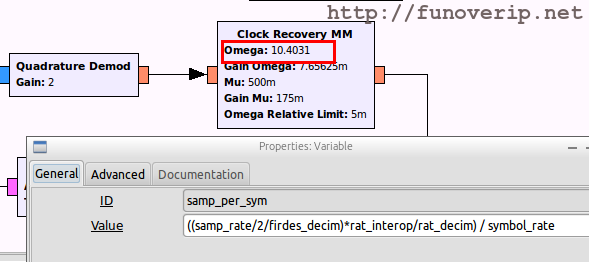
4.4.2. Samples per symbol
The number of samples per symbol is one of the most important value needed by the Clock Recovery block. Remember that your SDR device is configured to receive or transmit signal at a specified sample rate. The number of samples per symbol is just the number of samples needed to send one symbol (0 or 1), and is simply computed like this:
samples_per_symbol = sample_rate / symbol_rate
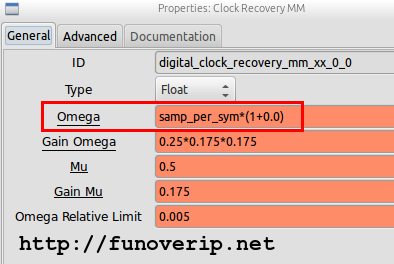
We now have everything we need to setup the Clock Recovery block:
4.5. Decoding packets
The remaining steps to get digital messages are to recognize the frames using the syncword (done by the Correlate Access Code block) and to decode them (done by the Packet Decoder block). There are a couple of GNURadio blocks dedicated to decoding/encoding packets but since we are dealing with CC1110 devices, we had to create specific blocks able to respect the CC1110 packets format. Further information about these blocks can be found on the following blog post: GNU Radio – CC1111 packets encoder/decoder blocks.
The final GNURadio flowgraph is:
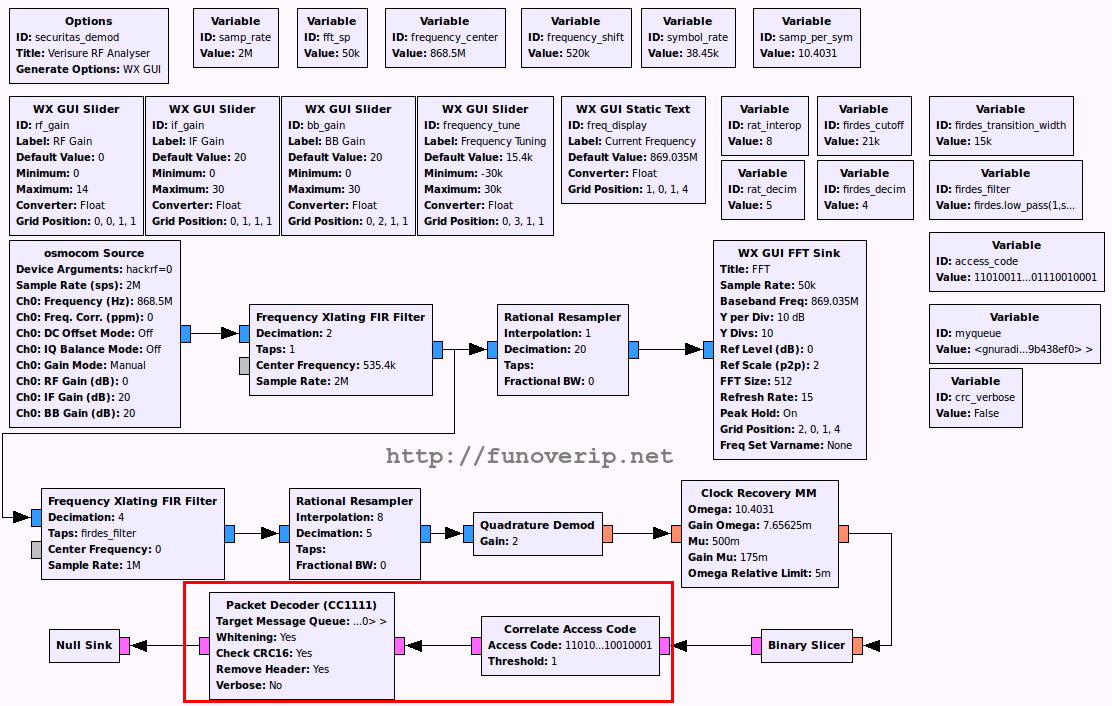
As you can see, the Packet Decoder (CC1111) block receives a python queue as argument (see Target Message Queue). This is where our decoded messages will be sent out.
This flowgraph will actually not be executed as it. Another python script will managed its execution and will pull messages from the python queue, dissect them (as Wireshark would do against a pcap file) and print them out on the screen.
Here below is the main script.
#!/usr/bin/env python
#=============================================================
# Securitas-Direct (Verisure) RF sniffer
# By Jerome Nokin (https://funoverip.net / @funoverip)
#=============================================================
#
# Usage: securitas_rx.py [-k KEY]
#
# optional arguments:
#       -k,--key <KEY>     Optional AES-128 Key (hexadecimal)
#
#=============================================================

import ctypes
import sys
import datetime
import argparse
from grc.verisure_demod     import verisure_demod
from threading              import Thread
from Crypto.Cipher          import AES
from binascii               import hexlify, unhexlify
from time                   import sleep

# Colors
def pink(t):	return '\033[95m' + t + '\033[0m'
def blue(t): 	return '\033[94m' + t + '\033[0m'
def yellow(t): 	return '\033[93m' + t + '\033[0m'
def green(t): 	return '\033[92m' + t + '\033[0m'
def red(t): 	return '\033[91m' + t + '\033[0m'

# Thread dedicated to GNU Radio flowgraph
class flowgraph_thread(Thread):
    def __init__(self, flowgraph):
        Thread.__init__(self)
        self.setDaemon(1)
        self._flowgraph = flowgraph

    def run(self):
        self._flowgraph.Run()
	#print "FFT Closed/Killed"

# AES decryption
BS    = 16
pad   = lambda s : s + (BS - len(s) % BS) * chr(BS - len(s) % BS)
unpad = lambda s : s[0:-ord(s[-1])]
def aes_decrypt(ciphertext, iv, key, padding=True):

    cipher = AES.new(key, AES.MODE_CBC, iv)
    plaintext = cipher.decrypt(ciphertext)
    if padding:
        return unpad(plaintext)
    else:
        return plaintext

# Generate timestamp
def get_time():
    current_time = datetime.datetime.now().time()
    return current_time.isoformat()

# Print out frames to stdout
def dump_frame(frame, aes_iv = None, aes_key = None):

    # Dissecting frame
    pkt_len = hexlify(frame[0:1])
    unkn1   = hexlify(frame[1:2])
    seqnr	= hexlify(frame[2:3])
    src_id	= hexlify(frame[3:7])
    dst_id	= hexlify(frame[7:11])
    data	= ""

    # Payload is a block of 16b and AES key provided ? Try to decrypt it
    if  (ord(unhexlify(pkt_len))-2-8) % 16 == 0 and aes_iv!=None and aes_key!=None:
        if unkn1 == '\x04':
            # block is 16b without additional padding
            data    = " ".join(hexlify(n) for n in aes_decrypt(frame[11:], aes_iv, aes_key, False))
        else:
            # block is 16b with padding
            data	= " ".join(hexlify(n) for n in aes_decrypt(frame[11:], aes_iv, aes_key))
        if len(data) ==0:
            data = "<empty> Wrong EAS key ?"
    else:
        data 	= " ".join(hexlify(n) for n in frame[11:])

    # Print out the frame
    print "[%s] %s %s %s %s %s %s" % (get_time(), yellow(pkt_len), blue(unkn1), seqnr, green(src_id), red(dst_id), pink(data))

# Main entry point
if __name__ == '__main__':

    aes_iv  = unhexlify("00000000000000000000000000000000")
    aes_key = None

    if sys.platform.startswith('linux'):
        try:
            x11 = ctypes.cdll.LoadLibrary('libX11.so')
            x11.XInitThreads()
        except:
            print "Warning: failed to XInitThreads()"

    # Read args
    parser = argparse.ArgumentParser()
    parser.add_argument("-k", "--key", help="Optional AES-128 Key (hex)", type=str)
    args = parser.parse_args()

    # Initializing GNU Radio flowgraph
    flowgraph = verisure_demod()

    if args.key:
        print "[%s] AES key provided. Decryption enabled" % get_time()
        aes_key = args.key
        aes_key = ''.join(aes_key.split())
        aes_key = unhexlify(aes_key)
        print "[%s] AES-128 IV : %s" % (get_time(), hexlify(aes_iv))
        print "[%s] AES-128 key: %s" % (get_time(), hexlify(aes_key))

    # current frequency
    freq = 0

    # Some additional output
    print "[%s] Starting flowgraph" % get_time()

    # Start flowgraph insie a new thread
    flowgraph_t = flowgraph_thread(flowgraph)
    flowgraph_t.start()

    # Until flowgraph thread is running (and we hope 'producing')
    while flowgraph_t.isAlive():
        # Did we change frequency ?
        if freq != flowgraph.get_frequency():
            print "[%s] Frequency tuned to: %0.2f KHz" % (get_time(), flowgraph.get_frequency()/1000)
            freq = flowgraph.get_frequency()

        # Emptying message queue
        while True:
            if flowgraph.myqueue.count() <= 0:
                break;
            frame = flowgraph.myqueue.delete_head_nowait().to_string()
            dump_frame(frame, aes_iv, aes_key)

        # I can't exit the script because of a blocking call to "myqueue.delete_head()". So for now..
        sleep(0.1)

    print "[%s] Exiting" % (get_time())

# vim: tabstop=8 expandtab shiftwidth=4 softtabstop=4
Here is the final output:
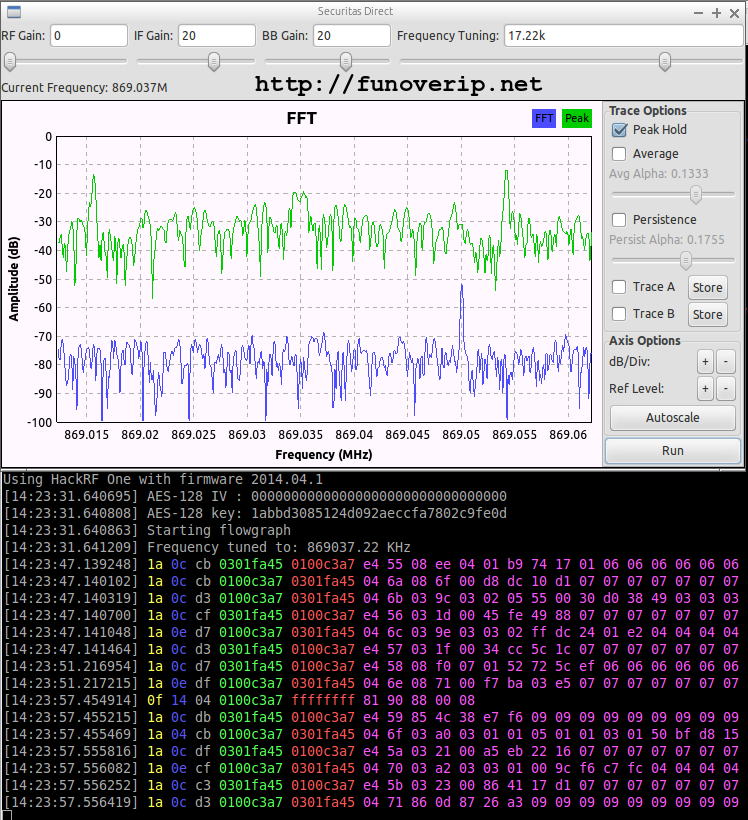
A few comments about the output. Briefly:
- In yellow: the length of the packet
- In blue: still unclear but it appears to be related to payload encryption (encrypted or not, has padding or not, …)
- In grey (and gray): a kind of sequence number
- In green: the source ID of the packet
- In red: the destination ID of the packet
- In pink: the payload
5. Final note
The reader has probably observed from the output of the script that an AES-128 key is provided and that payloads are decrypted. The way we recovered the key will be discussed later on at the following address. Don’t try this key at home since keys are randomly generated by the VBox.
GNURadio flowgraph and python script can be downloaded from https://github.com/funoverip/verisure-alarm.
Prerequisite:
- I’ve used HackRF One as SDR platform but any other SDR device should make the trick.
- You will need GNURadio 3.7 or above
- Do not forget to also install the GNURadio gr-cc1111 blocks !
Last but not least, a big thank you to Michael Ossmann for his awesome SDR class. Strongly recommended!
Hope you enjoyed this post…
Regards.

 (55 votes, average: 4.82 out of 5)
© 2014 – 2022, foip. All rights reserved.
Comments are closed.
Very interesting… I’ve a question not about the protocol, but more about the communication… A vendor tell me that is a “ping back” on two separate canal to avoid wireless network jamming and limit possible sabotage…
did you seen something like that (ping back or second (backup) canal ?)
regards,
Thierry